Wednesday, September 26, 2012

Giving it another go

Brothers

 
Here's another layout for the Pop Off The Page class at Studio calico


 Jen Jockisch does a weekly challenge for this class and I haven't been able to finish any of them in time but I still did this one. We were supposed to make a list of our favorite things to use while creating a layout. My list was washi tape, tag punch, tab punch, banner punch, twine, badges, spray ink, and a date stamp. I used some of them on this layout but not all.


 Here are some close up shots of the title. I have a habit of either using a title and no journaling or having journaling and no title. Not sure why, just turns out that way.


Got to use some thickers a friend gave me. I used a few of the items that came in the class kit like the arrow paper clip and the badge.


 Here's a close up of the tab from the class kit. I sprayed it with Mr. Huey's Passport then used the shine stamp from the kit as well. I saw Tracy form Mercy Tiara do this and thought it was cute. I punched some hearts out and used another stamp from the kit.


Here you can see the banner I made. I use the Jenny Bowlin banner punch and also some washi tape, strung them together with twine.


Here's the other side of the banner.

 I used Creative Memories Rugged paper. Love that line. I am getting more and more into this whole layering thing. I am used to having a ton of photos on my layouts so it's been hard just picking one photo to scrap. I do like it though.
 
Hope you have a great day and thanx for stopping by.

Sunday, September 23, 2012

It's Party Time!!

My baby boy turned 2!!


I just didin't have it in me this time to go all out for another birthday, poor Colton. After going over the top with Gus' pirate party in March, I decided to tone it down a bit.
I couldn't figure out a theme so I went with a Happy Birthday themed party.


 I made the banner with my Cricut as usual, with the help of my Gypsy of course.

I decorated mostly with balloons, which Colton loves!! So I guess that was good.


I tried to make this thing (not sure what to call it). I saw it on pinterest and it just didn't turn out as cute as the pic I saw. View it here. Oh well, what do ya do? As my trusty friend Michelle said, it's not awesome but it's cute.


Yay!! Cupcakes!!! I again made the cupcake toppers with my Cricut and Gypsy. Can't use my crucut without my Gypsy, just sayin.

 
Had a little trouble with the frosting. It came out real runny so I added tons more powdered sugar which helped a bit but made them very sweet. I put them in the firdge to firm up and that helped. Not much of a baker.
 
All in all, it was a great day and Colton had a blast!! He was showered with gifts and love form family.
 

Tuesday, September 18, 2012

A Humble Post About Me

Hi All!! I've been MIA for awhile. I guess I didn't feel like there was anything to blog about.
 
I watched the movie Julie & Julia and there was a line in that movie that made me think twice about blogging. Julie said something to the affect that blogging is all about "me me me" and it kinda weirded me out. I am an outgoing gal and all but I hate to admit things are always about me me me.... I wonder if any of my friends or family disagree with that. Chime in friends and family.
 
I realized that, yeah, a blog is a place to toot your own horn and all. I'm just hoping to do it in a humble way I guess.
 
With that said, I would like to toot about a class I'm taking over at Studio Calico called Pop Off The Page. It's all about layering on you projects. I love Rahel Menig's style and Marcy Penner's style and have always wanted to try layering but I guess I was scared to fail. This class kicked my but into gear and here's what I came up with. A layout full of layers about My Boys.


I mostly used paper from a pack my friend Michelle gave me. I don't even know what brand it is cuz the cover was not with it when I got it. i totally lifted Jen Jockisch's page form the class. I was a learning experience for me for sure.
 
 
Here is a few close ups of all the layers. I used some tissue paper, one of the glassine envelopes form the class kit, and some tags from the kit as well. I used my Cricut for the tittle on the tag.


The This Week journal spot and button is from the kit as well. Splattered a little Mr. Huey's and threw some washi tape down.


All in all I like how it turned out and can not wait to try again!!! Just wish I could get to scrappin more often!!!
 
Thanx for stoppin by and have a great day!!!!

Tuesday, August 21, 2012

Linguine with Asparagus, Parmesan, and Bacon

By far, my FAVORITE dinner meal!!


This is a recipe I got from my Cooking Light Annual Recipes 2007 cook book. It is so delicious and not too bad for you either. 360 calories for a 2 cup serving with 2 Tbs of Parmesan cheese isn't too bad for a dinner meal.
The light sauce is perfect with the fresh linguine. I love the flavor the bacon gives as well.
It comes together very fast so be prepared. 20 minutes is all.


I'm a more is always better kind of gal. I used more asparagus and bacon than it calls for so my calorie intake is more but you can follow the recipe and have a healthier meal :)


See here. Lots of asparagus. It calls for 1 lb but I didn't weigh it. I just picked up  2 bunches and used all of it!


You start off boiling a large pot of water and cooking the linguine according to package directions throwing in the asparagus in with it. Drain and set aside.


This is the brand I use. It says to cook it for 2 - 3 min is all.


Next, cook up 4 strips of bacon (I cooked up 6). Drain bacon grease, leaving 2 tsp in pan. Cool bacon and crumble.


Here's the next group of ingredients. From top left, chicken broth, lemon juice and oregano. From bottom left, cherry tomatoes, 1/2 onion, 2 cloves garlic.


Add onion, garlic, and oregano to pan with bacon drippings and saute for 4 minutes or until onion is lightly browned. Add tomatoes and saute for 2 more min.


Add broth and bring to boil, then add 1 Tbs butter, 1/4 tsp salt, and 1/4 tsp pepper and remove from heat.


 Place asparagus mixture in a large bowl, add tomato mixture and lemon juice, tossing well.


Top with bacon and Parmesan.

My hubby always needs more protein than any recipe calls for so I cooked up some chicken breasts for him to throw on top. He loves this dish and so do my boys. Very family friendly and so fast to prepare, it's great for busy mom's.

So good and good for you!!! I hope you all enjoy this!!
Here is a link to the recipe from My Recipes

Have a great day and thanx for stopping by!!!!


Wednesday, August 15, 2012

DIY Sketch Book

What a fun quick project this was. Right up my alley!!!


I made this for my husband for his birthday. He loves to do wood working but just doesn't have the time right now. He commented awhile back about how he has all these ideas of things to carve but when he actually sits down to do it, nothing comes to mind. So I thought maybe a sketch book might be nice to have around so when those ideas come to mind, he can sketch them out and refer back to them later.


I got this Studio Calico Journal Kit form the craft store and went to town!! So fun and easy!


The FabRips were really neat. I used it as the binding. The gal at the store recommended butting a strip in the middle of the book as well for extra support.


First thing I did was I sprayed the cover and back with Mister Huey's Passport spray ink.


once that was dry, I clipped the whole thing together, front cover, paper, and back cover and added the binding.


Then it was time to embellish!! My favorite part!
I used Echo Park Note To Self. Thought that would be perfect for this.


Not the best pic but oh well. I really like how the whole thing turned out. Chris liked it too :)

Thanx for stopping by and have a great day!!!

Tuesday, August 7, 2012

Mod Podge!!!

I think I've been hiding under a rock or something. I have never used Mod Podge before. I know, I know, what is wrong with me right?!?!?! I love it and can't wait to play around with it again!!!
This is a gift I made for a friends daughters birthday. It was so fun to make :)


I started with a chipboard letter and traced it on a piece of scrapbook paper. I used the Heidi Swapp Sugar Chic line for this project.


↑ This is the second letter I cut out because I traced the first on on the wrong side of the paper and as you can see I messed this one up too. Look at the top of the A. There was a boarder on the paper I didn't consider :( That's OK, cuz I just put it down a smidgen high and used sand paper to even out the edges and that part came right off and you can't even tell :)


↓ I made a pinwheel for an embellishment ↓


As you can see, my hubby spray painted the back of it. I screwed in some hardware so she can hang it up.


I didn't get any pics of my applying the Mod Podge :( But here's the finished project as well as some close ups of the embellishments.


What a fun project!!! I am flooded with ideas now of what else I want to Mod Podge :)
Have a great day!! Thanx for stopping by!!

Thursday, August 2, 2012

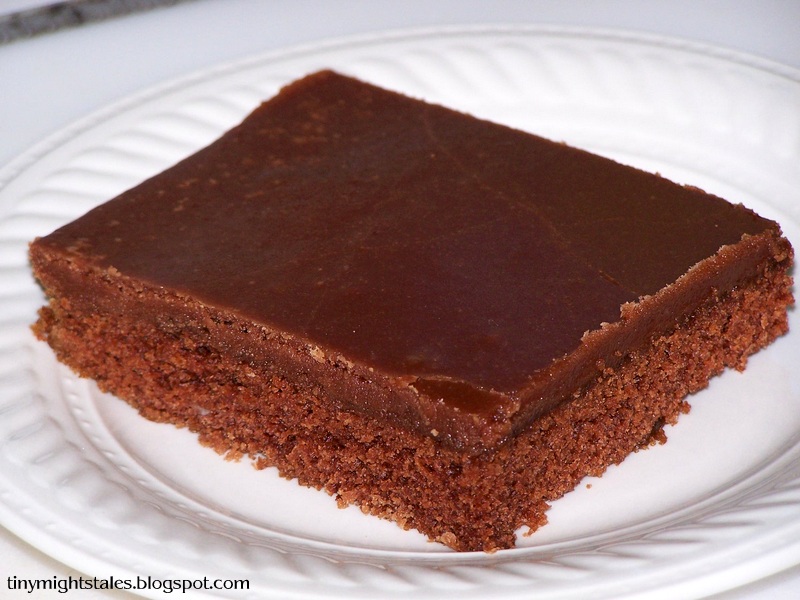
Aunt D's Brownies


This is the best thing you'll ever put in your mouth!!! My Mom called them brownies but they are more like a cake with the best frosting ever!!! This was my Aunt D's recipe, actually my mom's cousin, and this is another recipe that if my mom was alive she would have a come apart knowing I put this out there for the world to see. She did not like sharing her recipes much :) Sorry mom but it's way too good to keep to myself.

Brownie Ingredients:

2 Cups Flour
2 Cups Sugar
1/2 tsp Baking Soda
1/2 tsp Salt
2 Sticks Butter
4 Tbs Cocoa Powder
1 cup Water
1 tsp Vanilla 2 Eggs
1/2 cup Buttermilk

Directions:

Stir together flour, sugar, baking soda, and salt in large bowl. In a med sauce pan, bring to a boil butter, cocoa powder, and water. Pour this over dry ingredients and stir well. Add vanilla, eggs, and buttermilk. Stir well and pour into well greased jelly roll pan. Bake at 350ยบ for 15/20 min.

** Let brownies cool before frosting**

Frosting Ingredients:


1 Stick of Butter
3 Tbs cocoa powder
1 lb Powdered Sugar
1 tsp Vanilla
5-6 Tbs Buttermilk

Melt all this on stove on med heat until it starts to bubble, stirring constantly. Remove from heat and pour immediately onto cooled brownies.

I hope you enjoy these as much as my family does. I made them for my hubby's B-day recently. Always a hit. I even texted a pic to my sister Tammy to make her jealous. :) I stole my mom's recipe book from her awhile back so she doesn't have any of these recipes. ha ha. She'll just have to follow my blog to get it huh! Love ya Tammy!!!

Have a great day my friends!!!